You may have heard this before but it’s certainly true: automation of recurring processes is becoming increasingly important. And supposedly, thanks to ChatGPT and co., it’s also becoming easier. But code alone is of no use; processes and tools are needed to make such automation possible. The key word here is ‚low code‘ : administrators and users are supported with the necessary tools to build their own workflows without having to learn programming languages in depth. Let me walk you through how this works using a simple example. We will use the following tools.
- Microsoft Forms
- A graphical user interface is not always needed to provide the inputs required for the automated process. But especially when end users have to provide information, Microsoft Forms is an excellent and easy to use option for providing an input mask.
- LogicApp
- Azure Logic App is a semi-graphical tool in which the IT admin can put together and adapt any workflow. There is some code behind it, but the IT admin doesn’t have to worry about that (for now). Although it’s not possible to do without programming entirely, the graphical editor is there to support the IT admin.
On-Premises Data Gateway
- The On-Premise Data Gateway is a locally installed application designed to establish a connection to systems that are not yet in the cloud. These can include local file servers or databases.
In the Microsoft world, Powershell has established itself as the language for scripts. Why? Everything is very straightforward and logical. The main commands (get, set, etc.) are easy to understand and there is a Powershell module for practically everything with numerous commands and options. The learning curve is there, but not that steep. Very often an input file is required, which is then used to generate or process an output. What is missing? The graphical part, because it is a language for admins and not for end users. The good news: This gap can be bridged with Azure Logic Apps and Microsoft Forms

What could an example process look like?
- A user wants to increase the mailbox size
- To do this, the user fills out a graphic form
- This information is written to a file
- The file is picked up, read and processed by a Powershell script
How do we implement this technically?
Step 1:
- Create a form with Microsoft Forms
Step 2:
- Install an On-Premise Data Gateway
Step 3:
- Build an Azure Logic App and connect it to the gateway
Step 4:
- Process the resulting data using a Powershell script
Creating the form
This step is very simple because Microsoft Forms is part of the M365 Cloud and can be accessed at https://forms.office.com
A simple form could look like this:
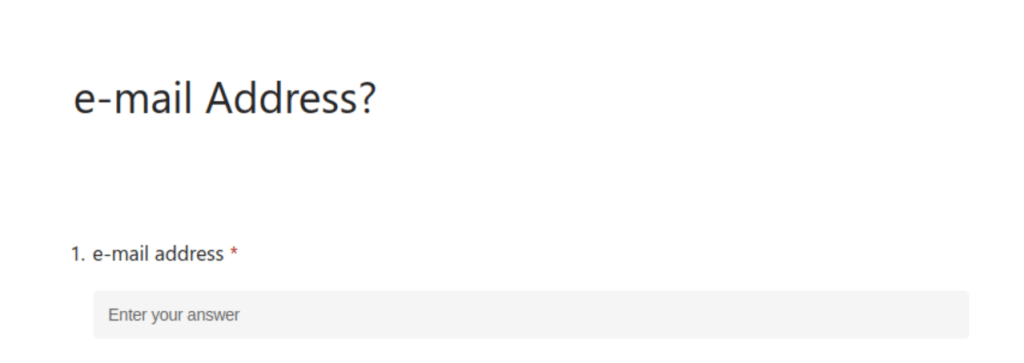
- Any data that the user submits can be read and processed by your Azure Logic App
- The security of the form can be configured. The user group of the form can be restricted via Entra.
Install the On-Premise Data Gateway
An on-premise data gateway is a locally installed application that is registered in Azure and checks for new information via port 443 (outgoing). I don’t want to go into this in detail here because the setup is straight-forward and well documented. An OPDG allows us to pass the data entered in Microsoft Forms to a local file server using Azure Logic App. We’ll see how this works in the next step.

Building the Logic App
And here it is, your very first Logic App! This is a graphical workflow that we put together in the Azure portal and requires limited programming knowledge. What should our new Logic App do? As you can see from the following screenshot, the Logic App basically consists of four steps. The last step is not always necessary, as we’ll learn later.
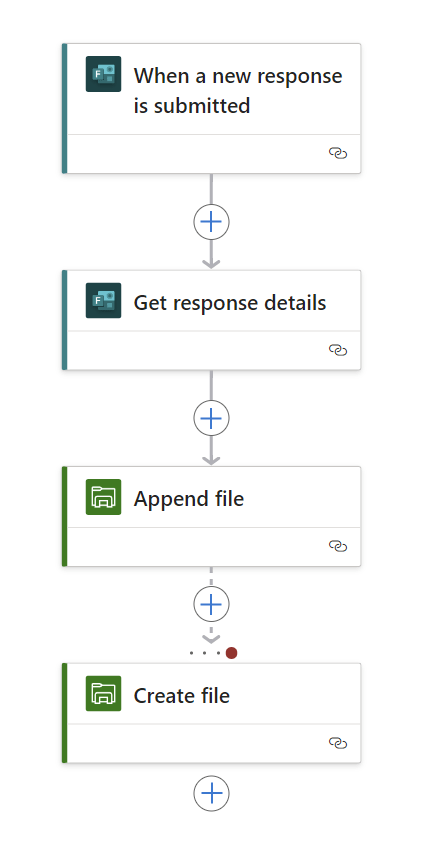
Step 1 – “When a new response is submitted”
- The Logic App waits 365 days and 24 hours a day for someone to fill out the form. And as soon as someone presses the ‚Submit‘ button, the workflow is triggered.
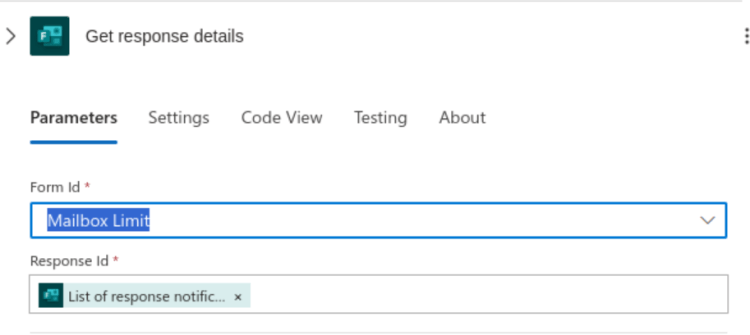
- The parameter ‚Form ID‘ is important here, which must refer to the previously created form.

Step 2 – “Get response details”
- In order for the information to be processed, it must be available for further steps. The entries from the individual fields can then be accessed via the field names, as defined in the form. The ‚get response details‘ block takes care of this.
Step 3 – “Append File”
- The form can be filled out as many times as you like. Each new entry adds another line to the file. This is a simple text file, listing one or multiple e-mail addresses.
- Next we define the path to the file. This is where the On-Premise Data Gateway comes into play, because now we’re actually talking about a file path that is not in Azure but on a local file server. The ‚Append File‘ function is only available if at least one OPDG has been created and registered. Of course, you could also store files in Azure, depending on your scenario.
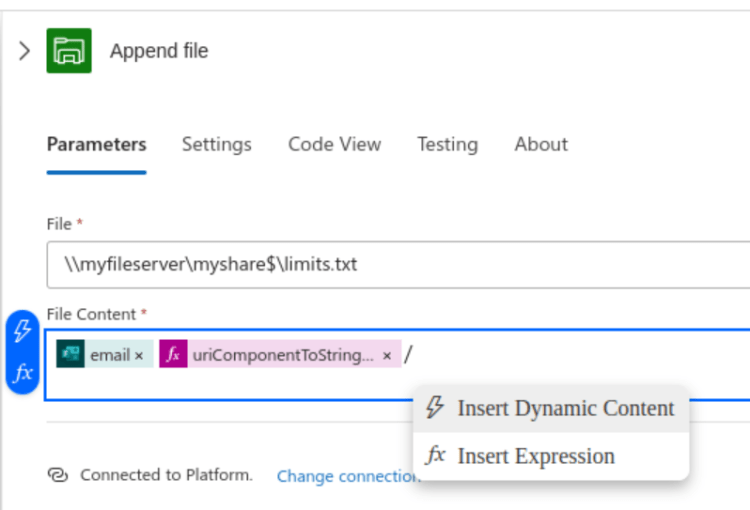
- Consider the following options for adding or editing content to the file
- Dynamic Content: These are the fields and properties of previous actions (the fields from ‚Get Response Details in step 2)
- Insert Expression: This allows for extended functionality such as text manipulation. In our example, we want one e-mail address per line and therefore need to switch to the next line after each entry:
- uriComponentToString(‚%0D%0A‘)
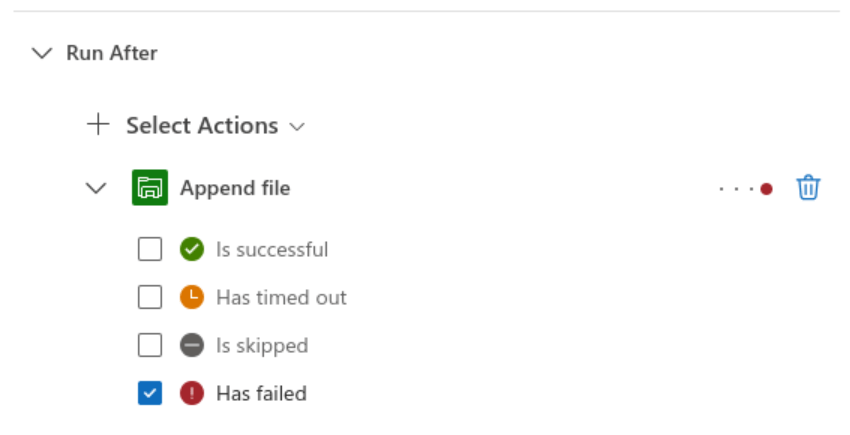
Step 4 – “Create File”
- Perhaps you are suprised that there is ‚create file‘ step? Wasn’t the file already added in step 3? The point to remember about this step is that it is only carried out if step three (Append File) doesn’t work. We will see why this is the case later in step 5. In Powershell this would be a ‚Try – Catch‘ block, but here we click through the options in the graphical editor, as we can see in the screenshot.
Step 5 – Retrieve and edit the file with Powershell
Let’s not go into the details of the Powershell script, as this post is really all about the Logic App options. To help you get started, I have added some information below with a mention of some of the relevant powershell commands.
- Thanks to steps 3 / 4, there is a text file with e-mail addresses. Let’s now use a ‚Scheduled Task‘ in conjunction with a Powershell script to regularly do the following:
- Is there a text file? (get-item, copy-item…)
- If yes: process names in the list (foreach ….)
- Sending an e-mail that the processing has been carried out (send-mailmessage…)
- Delete the file (remove-item…)
- Is there a text file? (get-item, copy-item…)
- This explains step 4: the file must be created if it does not yet exist. Let’s say that the task runs every hour? So a new name can be added to the existing file during that time (step 3) and otherwise a new file has to be created (step 4).
What about traceability?
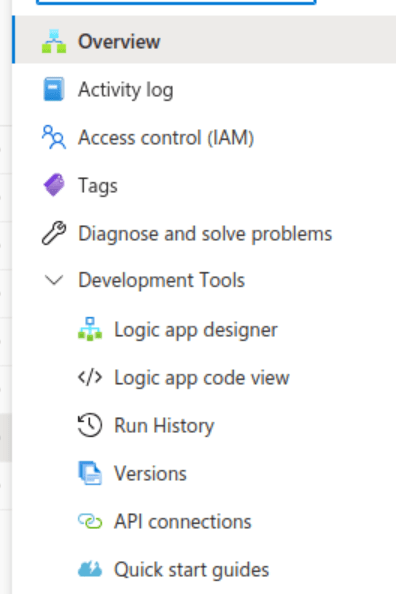
- Thanks to ‚Run History‘ and ‚Trigger History‘ we know when and how often the Logic App ran and why
- Using ‚Versions‘ we can go back to previous versions and identify changes
Conclusion
Hold your horses: Some scripting is still required. Error handling and plausibility checks etc. must be dealt with in the Powershell script in step 5 (at the latest). But now we can extend our existing processes or scripts with a graphical component and an input form. And all this can be done quickly and efficiently, thanks to Azure Logic Apps.
Final thoughts
Finally, here’s a reminder of important pages:
- The feedback page “ Sledgehammer ” – here you can ask questions or submit requests or ideas
- The T-Shirt Page – here you can support the ClickCoach team and look good at the same time