
Remember those old Wild West movies? Whenever the trek of settlers was under attack, they would immediately circle the wagons. The same was true whenever the trek had to stop overnight. But why? Obviously, they felt protected within the circle. Attackers could easily be spotted and repelled. Can you spot the connection between Wild West tactics and modern network design? Yes, there are still companies that think in terms of ‚inside -good‘ – ‚outside – bad‘. Anyone inside the circle has to be one of us, one of the good guys. No need to double check! But what if someone steals a cowboy hat and sneaks into the camp at night?

Users want to access everything from everywhere. They don’t care where the system is located. They might be using a mobile phone or a tablet or perhaps a trusty old desktop PC. Is it a ‚private‘ BYOD device or a ‚managed‘ company computer? It really shouldn’t matter. On the other hand, there is the continuous drive to optimize costs and to standardize processes. Cloud services support up- and down-scaling because new systems can be turned on (and off) at the touch of a button. This just in time approach means that you only pay what you need and when you need it. In this brave new IT world, there is no place for ‚circle the wagon‘ because your data or your systems can be anywhere in the world, thanks to Cloud services. But if anything goes, how can we ensure a high level of protection?
Looking at Azure and M365 environments, there’s of course ‚Conditonal Access (CAP)‚. Whenever someone tries to access a system, there is a transparent but detailed background check. Depending on the device type or user etc. we can ask for additional security checks (MFA) or deny access completely. For example a suspicious access pattern might lead to an immediate access revocation.But is this a sufficient level of protection? Hackers and Cyber criminals will always try to find new ways to get their hands on your company data and will look for weaknesses. You need to stay ahead of the curve. There has to be an intelligent early warning system that can discover attempted attacks and sound the alarm. The good news: There is no need to reinvent the wagon wheel. Today we will talk about ‚Sentinel‘.
So what do you need to use Sentinel?
An active Azure subscription. You may already have one for your M365 services, but if not you can get a free trial subscription here.
So what can Sentinel do?
- Centrally retain logfiles from different Azure / M365 and 3rd party solutions for further analysis
- Inform and alert (using both automated templates and manual rulesets)
What will Sentinel cost me?
To get a detailed overview you can alway use the Sentinel calculator. What it all comes down to is the amount of data you want to keep and for how long. There is also the matter of any automated workflows (Logic Apps) as you will be charged every time they are triggered. That may sound expensive, but really it isn’t. That’s because the recommended way to rollout Sentinel is gradually and not to enable everything at once. And there’s an (almost) free 30-day trial version. The important thing is to keep an eye on the charges. The most expensive monitoring and and alerting system will always be the one that’s not there.
So how does it work? How can I get this up and running quickly?
So here’s how you can activate and use Sentinel in a few quick and easy steps.
- Logon to the Azure Portal
- Look for ‚Sentinel‘ and click ‚Create‘ to setup a new Sentinel environment.
- The first thing you’ll need is a ‚Log Analytics Workspace‘ (this is where the actual logdata is retained). So we’ll create a new workspace as part of the initial setup.

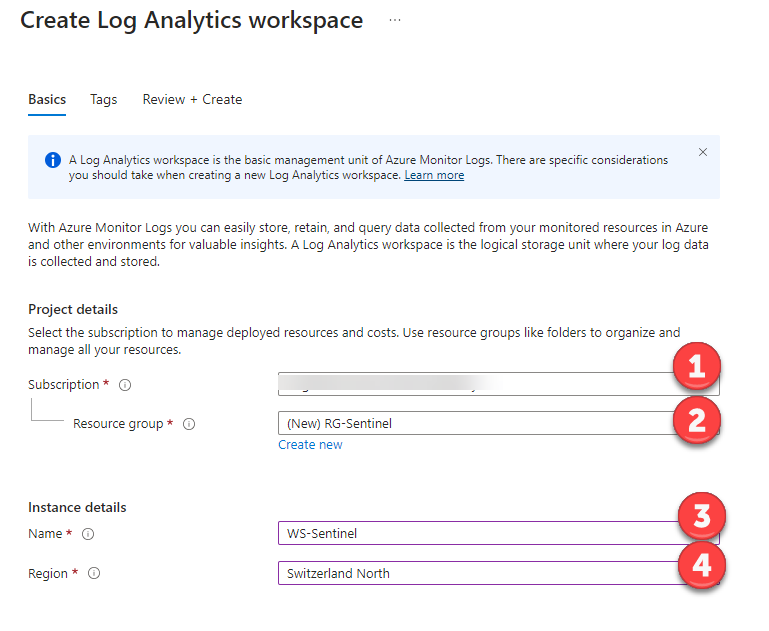
- Select your subscription
- Consider grouping objects in an ‚Azure Resource Group‘ (think of it as a type of management container)
- Pick a unique name for the workspace
- Pick your ‚Azure‚ region. Local laws and regulations may dictate a certain region but also keep in mind that there are cost differences between regions. See the calculator for details.

- Once created, select the new workspace from the list

- As a new user you may be elligible for the free 30-day trial. You’ll be asked to confirm this.
- Your next stop is the ‚Content Hub‘. This is where you’ll find predefined out of the box solutions for both Microsoft and 3rd party applications and services. For example, a search for M365 or Azure will show you all the related solutions.

- Select the solution you’re interested in and click ‚Install‘
- The solution is now installed but it’s still not configured / connected. So the next stop in gettings things and up and running is the ‚Data Connectors‘ page.

- Have a look at the bar next to the solution to see it’s current connection status:
- grey -> not yet connected
- green -> connected (after the configuration has been completed)
- So next you’ll need to select the installed product and click on ‚Open Connector page‘.

- The configuration options will differ, based on the selected solution. For example, when looking at the M365 solution you’ll need to choose the related applications (Exchange, Sharepoint, Teams).
- Once you’ve finished the initial setup, you’ll see many new templates on the ‚Analytics‘ page.

- Let’s say that we would like to be alerted if someone is trying to cover their tracks by deactivating the audit logs. There’s a template for that. So we can select the template and click on ‚Create Rule‘.

- As we create the rule from the template, we have multiple options. In this example we would like to automatically open an ‚Incident‘ and assign it to an owner (such as a Security Operations team).
- Once the rule has been created it will run on a fixed schedule (how often is configurable). The ‚Incident‘ will fire as soon as someone disables the Audit Log.
- But don’t just take my word for it. To prove the point, we will now use trusty old Powershell to disable and then immediately re-enable the Audit Log. We’re doing this in a test environment, so please don’t try this at home. 🙂 These are the commands (you’ll have to connect to Azure Powershell first):
- Set-AdminAuditLogConfig -UnifiedAuditLogIngestionEnabled $false
- Set-AdminAuditLogConfig -UnifiedAuditLogIngestionEnabled $true
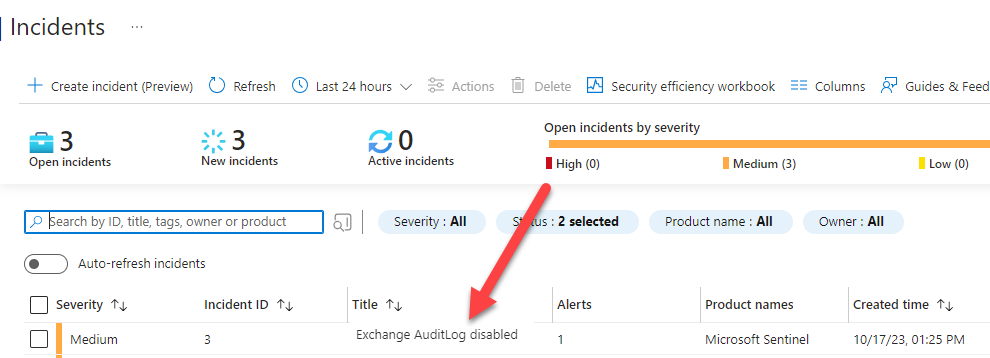
- …and soon after you’ll see the ‚Incident‘ appear in Sentinel. Works as designed. 🙂
Now this test only scratches the surface of what’s possible with Sentinel. But what’s impressive here is how quickly the basic setup is up and running. Now we’re ready to go further with automation. We can use ‚Playbooks‘ in combination with ‚Logic Apps‘ to refine our security operations tasks and to integrate and extend the solution. More on that topic to follow soon.

And finally…
Here’s a reminder of ways you can interact with us:
- ‚Hammertime‘ – Send uns your ideas and let us know what you think
- Get the ‚T-Shirt‘ – Impress friends and family while supporting our site.
